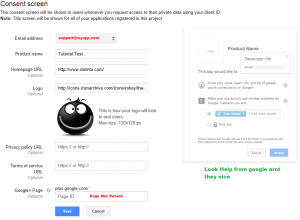
 Its time we take a look at the new Cloud console, its quite different then the old Google Apis console. I don’t think we have much longer before the turn off the old version completely so we might as well get used to using the new version now. I have tried to avoid it for a while now but its getting harder and harder to do that. The system seams to try and force you over to cloud console no matter what you do.
The Warning
The message of doom Google is changing something again…. oh no! Now I have spend hours trying to figure out how to do what I need to do. Lets face it when it comes to making APIs and Useful tools Google gets an A+, but when it comes to documenting some of this stuff and telling us how to use … not so much. I guess that’s good for me because it gives me something to post about.
[wp_ad_camp_3]
API Access
Everything you need to set up your application is under Apis & auth. The first menu item is APIs this is the one you use to set which API your application will be accessing. The main difference here is that it doesn’t give you the notes that the old system did.
The new system does place the selected API at the top which i admin would make it easier to find it. But how often will you need to find it really?
Credentials
[wp_ad_camp_1]
If you are unsure which type of Credential to create you can check my Authentcation article which explains the different types of authentication used to access google APIs it should help you decide which type you need for your project.
Credentials is where you set up the Access to your application. In the old system it was under API Access and they had the branding information in there as well. (Branding information has gotten its own menu item now we will talk about that next). I’m not sure if i like that they have renamed it credentials or not, my thought is that non English speakers may have trouble understanding Credentials VS access. I think it was easier to understand when it was labeled access.
One very nice thing you will find here is the Download JSon button. You can download the JSon file for your Credentials and then upload this file for use with your application. Useful? Maybe don’t know I don’t mind adding the code manually. But its there if you want it.
Consent Screen
This screen is nice a very nice change. All of this used to be buried in under API Access under a button called ‘Edit branding information’ . I once wanted to change an email address to me ages to find the button. Well now it has been moved to its own menu item called “Consent screen” which makes a lot of sense this is the consent screen users see when they are asked to approve your application. Google was even nice enough to give us a little map of what goes where. Makes me feel bad for saying earlier that they aren’t so good at helping us use there tools.
There are a lot of things you can change on here. But one thing I would like to point out is the email. The email is a list of people that have permissions for the application (you can find that in the permissions menu). This email will be displayed to the users so that they if they have any problems they can contact someone. Its a good idea to create a support email for the application support@myapp.com then add that under permissions, set it to owner and you will be able to select it in this list.
Conclusion
I hope this spread a little light on the new Google Cloud console as you can see there are some very nice changes from the old Google Apis console. The new Oauth2 consent screen alone makes this a wonderful change.


very helpful indeed!